Hey Y'all -
How is this week going. My allergies are going bonkers. Stuffy and runny nose that is worse at night and first thing in the morning. This happens every year at the change of seasons. I have to keep telling myself that I like this time of year. It is cooling down but still warm enough outside that you enjoy being outside without having 4 layers on underneath your coat.
My latest project was a DIY Ruler Growth Chart - thank you Back to Her Roots via Pinterest.
What you need:
1 - 8 inch x 6 ft pine board
sand paper - fine grit (~220)
small container of Minwax wood stain and/or polyurethane
pencil
black acrylic paint
paintbrush
1. I started with gently standing the board down my hand and smooth all the edges. The board I got at Home Depot. I looked at a few pieces to choose one that I liked how the grain and knots were. Also be sure the check out the edges of the board.
2. 2 coats of wood stain on all sides. Follow directions on the can.
3. 1 coat of polyurethane and allow to dry.
I was able to do all 3 of these steps in one day. I let it dry for 24 hrs before adding my ruler lines.

4. Marked out every 1 inch on the board. 1 inch marks for the 1/8 inch marks, 2 inch marks for the 1/4 inch marks.
- I marked the board in pencil first then went back with the paintbrush.
- looking back I shoulder have used a straight edge for the painting aspect.
5. I then printed numbers 1-6 in a font that I liked. Traced the outline with pencil to make a depression into the wood. Using that depression, I painted the numbers.
6. I Then did 2 more coats of polyurethane after the acrylic had dried.

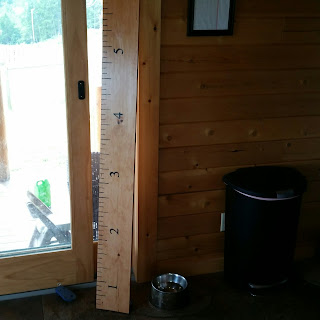
To hand this beauty, I bought picture hangers from Joann's that was simple to hammer right onto the board. I just did my best to make sure it was center to hang evenly.

Finished Product hung on the wall. I hung it 6 inches of the ground because the "ruler" starts at 6 inches. The lines are pretty close to accurate but not perfect. If I was selling this I wouldn't sell this one, but I like the way it turned out so I'll keep it up. I wrote in the actual measurement when I measured the kids along with the date.

Hope this inspires you to get crafty.
 |
| source |